How to make a multiplayer game with Colyseus and KAPLAY
If you have ever dreamed about making a multiplayer game but had no idea where to start or found it too hard to give it a try, now it’s great time to give it a shot! There are many options to implement multiplayer in your game, but this time we are going to do so with a particular one, that is very easy to work with!
About Colyseus
Colyseus is a fully-featured open source multi-player framework. It’s versatile and scalable for any game genre. The key features we are going to take an advantage of are automatic state synchronization and creating a game room on demand. Having this ready out-of-the-box is a great initial help so you can focus on your game itself, instead of doing (basically a lot of) boilerplate work. All these concepts and more will be explained further.
This guide will cover:
- How to get started with Colyseus
- Explanation and creation of state schemas your game will and might use
- Creating a simple game with concepts mentioned
- Some tips and tricks by Mark himself (he’s actually smart) :mark:
Prerequisites or good to know/have:
- Same as KAPLAY’s: Node.js, npm and Git installed ideally
- There will be some TypeScript here and there, but very understandable
- Terms like client and server are shuffled a lot - client is either the game part of our client/server setup or person connecting to the server, server is the room/Colyseus part or dev server running in your terminal for each of them
Also, if you are not interested in multiplayer that much, it still might be worthwhile for you as you can still learn a lot in the game-making section. 😉
How to get started with Colyseus
The easiest way to make a game with Colyseus is by using the official KAPLAY + Colyseus quickstart repository.
- Navigate to your project folder and clone the starting repository
git clone https://github.com/colyseus/kaplay.git kaplay-colyseus- Make it your own repository
# Linux (Bash)
cd kaplay-colyseus; rm -rf .git; git init; git add .; git commit -m "Init commit"

# Windows (PowerShell)
cd kaplay-colyseus; rm -r -Force .git; git init; git add .; git commit -m "Init commit"

# Windows (CMD)
cd kaplay-colyseus && rmdir /s /q .git && git init && git add . && git commit -m "Init commit"After doing so, created kaplay-colyseus folder should contain two folders,
client and server. As you might already suspect, all KAPLAY code will reside
in the former and Colyseus in the latter folder. The most important files to us
will be /server/src/rooms/MyRoom.ts and
/server/src/rooms/schema/MyRoomState.ts. We will get to the client one later
on.
How is KAPLAY (client) communicating with Colyseus (server)
First of all, alongside your regular KAPLAY setup, there is also a Colyseus npm package installed alongside. This is an SDK library that initiates connection and communicates with your Colyseus server running. It provides various helpful methods such as connection to the rooms, two-way state syncing, broadcasting and listening to the messages.
The connection itself is done in two parts:
-
Establishing the server connection with the endpoint of your server
/client/src/core/colyseus.tsimport { Client } from "colyseus.js"; export const colyseusSDK = new Client( `${location.protocol}//${location.host}/colyseus`, ); -
Connecting the client to it
/client/src/App.tsimport { colyseusSDK } from "./core/colyseus"; const room = await colyseusSDK.joinOrCreate<MyRoomState>("my_room", { name: "Ka", });
What are rooms in Colyseus
As we mentioned rooms multiple times and you could notice rooms folder and its
files inside, it’s the right time to talk about them a little more.
Room is basically a connection instance that players connect to. You can have many rooms like lobby and then game modes, but a single room is enough as well. You also define max clients per room, so when you have a game for 2 players, each couple will have their own separate room. And as soon as both players disconnect, the room is disposed, by the default. This will Colyseus do for you automatically, so you don’t have to worry about anything. It’s just good to know. 🙂
There is also a state of your game defined in the room and synced to clients.
Room is also where you define all the events like onJoin or onLeave, as you
might be guessing - when a player (client) connects or disconnects.
How does room state work
In Colyseus for room state to work, you need to define a schema with all the properties your objects will have. For example, your room state will include players and each player will have an id, name, avatar, etc. Depending on the game type, also the other data like x and y position. You will define all of that in the state schema so room can expect and enforce data type on all these properties.
Example of the room state in /server/src/schema/MyRoomState.ts:
import { MapSchema, Schema, type } from "@colyseus/schema";

export class Player extends Schema {
    @type("string")
    public sessionId: string;
    @type("string")
    public userId: string;
    @type("string")
    public avatar: string;
    @type("string")
    public name: string;
    @type("number")
    public x: number = 0;
    @type("number")
    public y: number = 0;
}

export class MyRoomState extends Schema {
    @type({ map: Player })
    players = new MapSchema<Player>();
}
You can later send a message to the room to update the state. For example, updating your player’s position:
In your game:
k.onClick(() => room.send("move", k.mousePos())); // { x: 200, y: 100 }And listening on server side, inside of onCreate room event:
this.onMessage("move", (client, message) => {
    const player = this.state.players.get(client.sessionId);
    player.x = message.x;
    player.y = message.y;
});
Client side, your room.state will be updated automatically, but you can also
listen to changes yourself, like:
import { client, getStateCallbacks } from "colyseus.js";
// ...
const $ = getStateCallbacks(room);

$(room.state).players.onAdd((player, sessionId) => {
    // Listen to any instance change
    $(player).onChange(() => k.debug.log(`Player ${player.name} is alive!`));

    // Listen to a property change
    $(player).listen(
        "x",
        (x, prevX) => k.debug.log("Player moved to", x, "from", prevX),
    );
    $(player).listen(
        "y",
        (y, prevY) => k.debug.log("Player moved to", y, "from", prevY),
    );
});
$ is a getStateCallbacks proxy helper imported from Colyseus SDK. You need
to wrap the room state to be able to register onChange and isten listeners
for their instance or property changes.
And finally, you can also broadcast your custom messages from the server with
any data.
On server:
this.broadcast("chat", message);In game:
room.onMessage("chat", (message) => k.debug.log(message));There is also a nice breakdown for everything state related in the official Colyseus documentation.
Starting your game dev servers
Now that we have the basic knowledge of the library concepts and client-server communication, we are finally ready to start our dev servers. 🥳
First, we need to get our Colyseus server started:
cd server
npm install
npm start
Second, open new terminal tab/window and start your KAPLAY game dev server:
cd client
npm install
npm startNavigate to your game at http://localhost:5173, you should see a simple KAPLAY
setup with a random crew member! And you know what, open the game in another
window, side by side and you got yourself the multiplayer part already working!
✨
Creating a fun game as an example
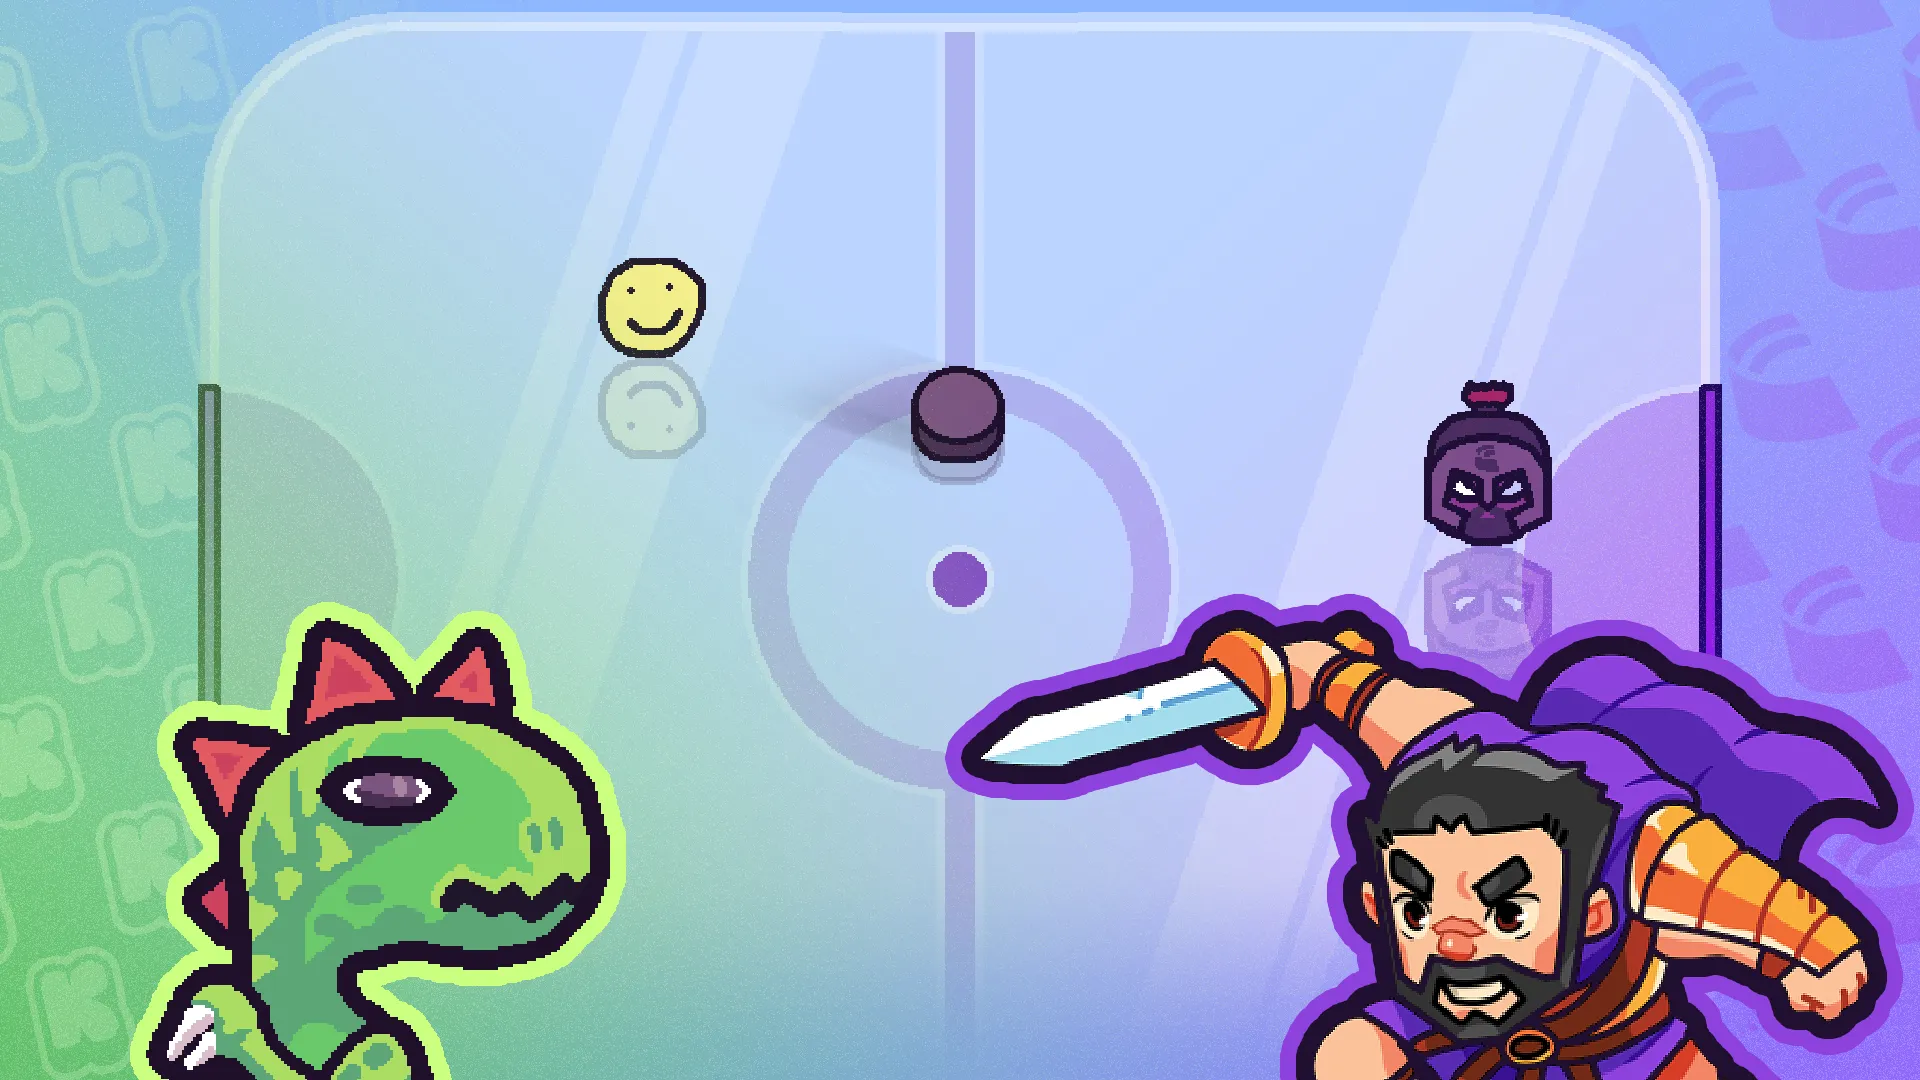
With the knowledge gained so far, you could already go and try to make a game yourself. But we are just getting started. There is much more to learn. Some (best) practices and caveats, depending on the game itself. And I think, by making an Air Hockey game is a good example to show many of them. As you might have been already suspecting from the thumbnail. 🙂
The whole game code can be found here, but we encourage you to code along with us throughout the guide. There is also a live demo towards the end (just so you don’t get spoiled too early).
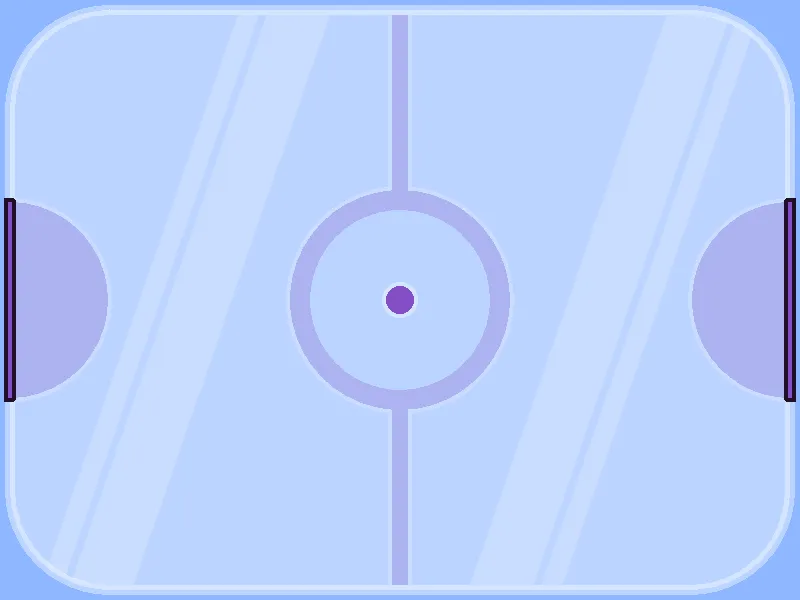
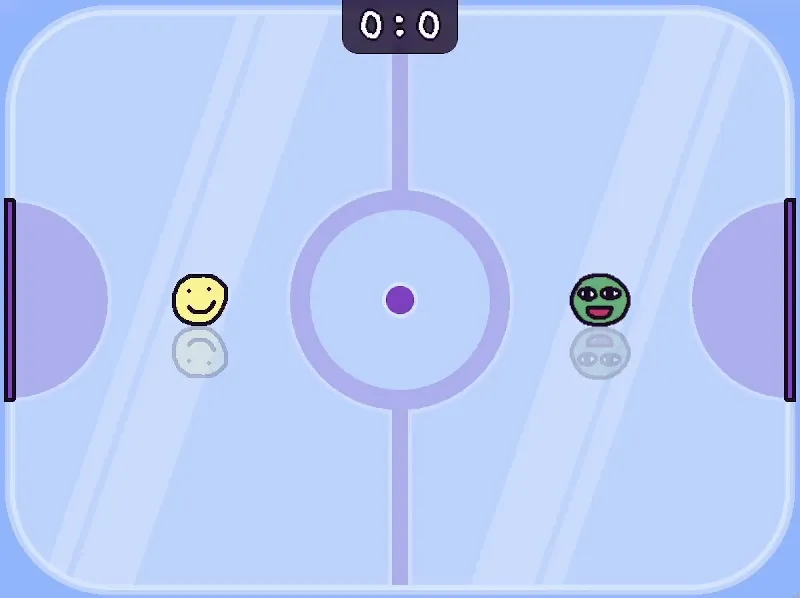
Let’s summarize what our game will be about, it’s features and restrictions:
- Playground/field size similar to hockey
- Two players game, each movement restricted to their own half of the field. Imagine having a paddle that you move with your hand at the top of one of the sides of the table/field. You can’t reach past your half.
- Ice-like sliding physics for players, puck, and bounciness when hitting the walls
- Score counting for goals, each goal resetting both players and the puck
Common data
For the field size, we will create a separate globals.ts file at the root of
the project, as we will need it for both, client, and server. This will
ultimately be the canvas size and will be used to calculate spawn positions. We
will address those later.
export const GAME_WIDTH = 800;
export const GAME_HEIGHT = 600;
Updating state schema
From our game summary, we can already think of the state properties we will going to need (besides those we already have):
- Player team/side (simply “left” or “right”)
- Puck X & Y position coordinates
- Score for each team/side
Let’s update the schema state file /server/src/rooms/schema/MyRoomState.ts:
// Player schema
export class Player extends Schema {
    // ...
    @type("string")
    public team: "left" | "right" = "left";
}
We added team for the player. See, TypeScript is here to define possible
values. Still understandable even if you are still “team JavaScript” 🙂. We also
set "left" as the default.
// Room schema (below the player)
export class MyRoomState extends Schema {
    @type({ map: Player })
    players = new MapSchema<Player>();
    @type("number")
    public puckX: number;
    @type("number")
    public puckY: number;
    @type("string")
    public lastHitBy: string;
    @type("number")
    public leftScore: number = 0;
    @type("number")
    public rightScore: number = 0;
}
And these are the rest of the properties that are good enough to be defined right in the room state schema. For example, we could do separate schema for puck with x/y props, but it doesn’t make much sense for a single object that has no multiple instances.
Updating the room
Besides adding the new team property, we are also going to update max player
count and some values to address the game dimensions we earlier prepared globals
for. Add to the top of the /server/src/rooms/MyRoom.ts file:
import { GAME_HEIGHT, GAME_WIDTH } from "../../../globals";Next we change the max players count from 4 to 2 and add a little helper method for the player count per team:
// ...
export class MyRoom extends Room {
    maxClients = 2;
    state = new MyRoomState();

    teamPlayersCount(team: "left" | "right" = "left") {
        return [...this.state.players.values()].filter(p => p.team == team).length;
    }
Now, within the same file, find the onJoin method and update it so team is
assigned to the player once joined and change the spawn positions from random to
the center of the side (quarter), depending on the team:
onJoin (client: Client, options: any) {
    console.log(client.sessionId, "joined!");

    const player = new Player();
    player.team = this.teamPlayersCount() % 2 ? "right" : "left";
    player.x = player.team == "left" ? GAME_WIDTH / 4 : GAME_WIDTH - (GAME_WIDTH / 4);
    player.y = GAME_HEIGHT / 2;
    //...
}
You might wonder why assigning team by even number. That’s if we later decide to increase the max player count, so users will join each team evenly in altered way.
Now, if you open your game three times, you can see you will be alone in the third one. That means the max player count is working. We can also see the players spawn on fixed spots but it’s not quite at the sides of the screen yet, as we haven’t updated our canvas size yet. Let’s fix that.
Updating the game
First things first, let’s update our KAPLAY library to ^4000.0.0-alpha.17 to
get some goodies that will help with our game. Namely, circle shapes for
collisions. You know, the puck is round. And restitution option to make the
puck bounce off the walls. Instead of doing it ourselves, since we have a lot
ahead of us. 🙂
cd client
npm install kaplay@^4000.0.0-alpha.17Now, let’s change the general setup of our game. Such as canvas size mentioned, so it’s the same for both players and not affected by their screen size. And other options like background.
We will add these options to the kaplay() init function, update
/client/src/App.ts file like this:
import "./index.css";
import { GAME_HEIGHT, GAME_WIDTH } from "../../globals";
// ...

// Initialize kaplay
export const k = kaplay({
    width: GAME_WIDTH,
    height: GAME_HEIGHT,
    letterbox: true,
    pixelDensity: Math.min(window.devicePixelRatio, 2), // crispier on phones
    background: "8db7ff",
});
At this point, I think we would benefit of having a nicer background to look at, which will also help us visualize the movement restriction we will do next. But let’s not get ahead of ourselves and add the playground first!
We will create a new folder /client/src/objs where we will put all of our
future objects. Each file will export an array of components, as it’s what an
object is composed in KAPLAY of.
Let’s create playground.ts in the folder. It will be basically an object with
boundaries to keep the puck in, field background and the goal nets. We could use
one sprite for all of that, but we are going to draw it all in KAPLAY instead!
😮
import type { GameObj } from "kaplay";
import { k } from "../App";

export default () => [
    k.pos(),
    k.z(0),
    {
        add(this: GameObj) {
            const thickness = 500;
            const bleed = 5;

            this.boundaries = [
                {
                    x: -thickness,
                    y: -thickness,
                    w: k.width() + thickness * 2,
                    h: thickness + bleed,
                },
                {
                    x: -thickness,
                    y: k.height() - bleed,
                    w: k.width() + thickness * 2,
                    h: thickness + bleed,
                },
                {
                    x: -thickness,
                    y: -thickness,
                    w: thickness + bleed,
                    h: k.height() + thickness * 2,
                },
                {
                    x: k.width() - bleed,
                    y: -thickness,
                    w: thickness + bleed,
                    h: k.height() + thickness * 2,
                },
            ].map(({ x, y, w, h }) => {
                this.add([
                    k.pos(x, y),
                    k.rect(w, h, { fill: false }),
                    k.area({ collisionIgnore: ["boundary"] }),
                    k.body({ isStatic: true }),
                    "boundary",
                ]);
            });
        },
    },
];
Here we added invisible boundaries, that are outside of our screen, but bleed 5 pixels in. So if we enabled rectangles fill, we would see just 5px lines instead of 500px. Also, with thickness like that, we ensure the puck won’t break out instead of bouncing away. It will be rejected back to the field as the distance back would be shorter than past it, if it manages to get a few pixels in (physics are updated at 50fps). I thought Mark was smart enough to say it himself.
Also, we added them to collisionIgnore array as they would be touching
continuously forever and we don’t need to waste our resources on it. We made
them static as well, as they should never move.
Let’s continue with the field, right under the this.boundaries code. We will
center it as it will be easier to draw from the center as well:
const field = this.add([
    k.anchor("center"),
    k.pos(k.center()),
    k.rect(k.width() - 20, k.height() - 20, { radius: 100 }),
    k.outline(10, k.WHITE),
    k.opacity(0.4),
]);
I don’t have anything smart to say about this either, so let’s just add the nets as well right after:
const nets = [-1, 1].map(side =>
    field.add([
        k.anchor("center"),
        k.pos(field.width / 2 * side, 0),
        k.rect(8, 200, { radius: side == -1 ? [0, 2, 2, 0] : [2, 0, 0, 2] }),
        k.color(k.Color.fromHex("834dc4")),
        k.outline(4, k.Color.fromHex("1f102a")),
        k.area({ collisionIgnore: ["boundary", "player"] }),
        "net",
        {
            team: side == -1 ? "left" : "right",
        },
    ])
);
There are two things interesting here. The first one is that we are doing nets
for both left and right side in one go and we are setting the net.team
property for us to use later, for example to determine what net was scored into.
And similarly, we don’t need the collisions to bother with boundaries or
players.
I promised we will draw the field in KAPLAY. We will do so in one draw event,
right below the nets like this (brace yourself):
field.onDraw(() => {
    k.drawMasked(() => {
        // Background center circle
        k.drawCircle({
            radius: 114,
            color: k.Color.fromHex("c9ddff"),
        });

        // Middle line
        k.drawRect({
            anchor: "center",
            height: field.height - 5,
            width: 20,
            color: k.Color.fromHex("adb2f0"),
            outline: {
                width: 4,
                color: k.Color.fromHex("c9ddff"),
            },
        });

        // Foreground center circle
        k.drawCircle({
            radius: 100,
            color: k.Color.fromHex("bbd4ff"),
            outline: {
                width: 20,
                color: k.Color.fromHex("adb2f0"),
            },
        });

        // Small middle circle
        k.drawCircle({
            radius: 16,
            color: k.Color.fromHex("834dc4"),
            outline: {
                width: 4,
                color: k.Color.fromHex("d6e5ff"),
            },
        });

        // Nets :)
        nets.forEach(net => {
            k.drawCircle({
                anchor: "center",
                pos: net.pos,
                radius: net.height / 2,
                color: k.Color.fromHex("adb2f0"),
                outline: {
                    width: 4,
                    color: k.Color.fromHex("c9ddff"),
                },
            });
        });

        // Reflections
        [
            [-450, 20],
            [-400, 60],
            [0, 60],
            [50, 20],
        ].forEach(([x, w]) =>
            k.drawLine({
                p1: k.vec2(x + 400, -field.height),
                p2: k.vec2(x, field.height),
                width: w,
                opacity: 0.2,
            })
        );
    }, () => {
        // Field mask
        k.drawRect({
            anchor: "center",
            width: field.width - 10,
            height: field.height - 10,
            radius: +(field?.radius ?? 100) - 10,
        });
    });
});
It looks complicated but there is no science to it. The only thing worth
mentioning here is that we used drawMasked(), so any overflowing drawings,
like the net circles, are cut off to not overflow the field. Field rectangle
excluding the outline is used as a mask.
And finally, let’s import the playground to the game, in
/client/src/scenes/lobby:
// at the top after the other imports
import playground from "../objs/playground";

export function createLobbyScene() {
    k.scene("lobby", (room: Room<MyRoomState>) => {
        k.add(playground());
        // ...
Player movement
Now that we have a reference point where the middle line is, let’s implement the player object with restricted mouse movement that we defined as a game pattern earlier. Similar as you would use your hand to move the air-hockey paddle.
To better separate concerns in our code, we will create a player.ts file in
our /client/src/objs folder:
import type { GameObj, Vec2 } from "kaplay";
import type { MyRoomState, Player } from "../../../server/src/rooms/schema/MyRoomState";
import { k } from "../App";
import { Room } from "colyseus.js";

// Needs room state and player instance for server communication and player data
export default (room: Room<MyRoomState>, player: Player) => ([
    k.sprite(player.avatar, { flipX: player.team == "right" }), // player on the right side will face center
    k.pos(player.x, player.y), // initial pos by server
    k.anchor("center"),
    k.area({ shape: new k.Circle(k.vec2(0), (k.getSprite(player.avatar)?.data?.width ?? 32) * 0.4) }), // smaller area than sprite to not collide with transparent parts
    k.body({ isStatic: true }), // won't be affected/moved when hit
    k.scale(0), // we will scale-in player on spawn
    k.z(player.y), // update Z sorting as well by matching it to Y
    "player",
    {
        // Define a bunch of useful properties
        sessionId: player.sessionId,
        team: player.team,
        startPos: k.vec2(player.x, player.y),
        moveLerp: 12, // for position interpolation
        overshootLerp: 30, // for fast movement interpolation
        controllable: true, // e.g. disable when resetting player on goal
So far this is the base object for our player with more or less simple values.
You can see some lerp properties, we will address those later. Let’s continue
with some more complicated ones for the restricted movement itself and the logic
how the position will be updated and synced.
    add(this: GameObj) {
        // Scale player in with nice transition once added
        k.tween(this.scale, k.vec2(1), 0.25, v => this.scale = v, k.easings.easeOutBack);

        // Raytracing :)
        this.add([
            k.anchor("center"),
            k.sprite(player.avatar, { flipX: this.flipX, flipY: true }),
            k.pos(0, k.getSprite(player.avatar)?.data?.height ?? this.height),
            k.opacity(0.2),
        ]);

        const moveOffset = {
            x: this.width / 2,
            y: this.height / 2,
            overshoot: 10,
        };

        this.moveMinMax = {
            x: Object.values(player.team == "left" ? {
                min: moveOffset.x,
                max: k.width() / 2 - moveOffset.x + moveOffset.overshoot,
            } : {
                min: k.width() / 2 + moveOffset.x - moveOffset.overshoot,
                max: k.width() - moveOffset.x,
            }),
            y: Object.values({
                min: moveOffset.y,
                max: k.height() - moveOffset.y,
            })
        };

        if (player.sessionId == room.sessionId) onLocalPlayerCreated(room, this);
    },
  },
]);Well, the actual most important thing here is the moveMinMax, the minimum and
maximum position coordinates for the players. Player on the left side, can move
from 0 to half of the screen, where the middle line is. With player object size
taken into account, as well as the overshoot. We have that so you can go
slightly past the line, to not loose all the momentum right in front of it, like
when trying to hit the puck in the center, but barely reaching it.
If you are confused seeing Object.values, it’s just to visualize the min and
max better than in a simple array. As the array will be easier to use in code
later. And last but not least, we will call onLocalPlayerCreated() function
that we are going to code next.
Why do we need the “local” player you may ask? Well, for example, we want you to control just one of the player objects. The one that belongs to you. Among the many other occasions where you need to think of if the event should trigger for all, or just for you, or if you want to sync your state and let the other’s sync theirs.
So let’s create the onLocalPlayerCreated() function, at the end of the file:
function onLocalPlayerCreated(room: Room<MyRoomState>, playerObj: GameObj) {
    // differentiate local player with tag
    playerObj.tag("localPlayer");

    // save mouse pos locally
    let mousePos = playerObj.startPos;
    const [moveMinX, moveMaxX] = playerObj.moveMinMax.x;
    const [moveMinY, moveMaxY] = playerObj.moveMinMax.y;

    const move = (_: Vec2, delta: Vec2, isMouse = true) => {
        if ((isMouse && !k.isCursorLocked()) || !playerObj.controllable) return;

        const { x, y } = mousePos;
        const newX = x + delta.x;
        const newY = y + delta.y;

        mousePos = k.vec2(
            k.clamp(moveMinX, newX, moveMaxX),
            k.clamp(moveMinY, newY, moveMaxY),
        );

        room.send("move", mousePos);
    };

    k.onMouseMove(move);
}
Here, in the move function, we are checking if player has cursor locked -
players will have to click first to take control so their cursor won’t fly out
of the window losing focus and control. In general, to update new position, we
would do axis + delta.axis, but the movement is clamped and isn’t applied to
the player object immediately. Instead is sent to the server, where we will
account for latency as well. Let’s head back to our player object above, and
update the players position so you can understand it better. Add this below the
add() function:
update(this: GameObj) {
    this.pos.x = k.lerp(
        this.pos.x,
        player.x,
        k.dt() * (this.moveMinMax.x.includes(player.x) ? this.overshootLerp : this.moveLerp)
    );
    this.pos.y = this.z = k.lerp(
        this.pos.y,
        player.y,
        k.dt() * (this.moveMinMax.y.includes(player.y) ? this.overshootLerp : this.moveLerp)
    );
},
First of all, notice we use player.x and player.y. This comes right from our
server state which is always updated, especially as we are sending new position
with room.send("move", mousePos); on mouse move event. Instead of applying it
directly to the object pos as e.g. this.pos.x = player.x, we are going to
apply linear interpolation k.lerp() between those values. That makes the
movement smooth instead of being laggy or jumpy, as the server updates the value
with a slight delay. We stored the lerp amount value as the property
this.moveLerp. Basically, lower the number, the smoother the movement will be.
But also slower and with higher delay, so with 12 we found a good
middle-ground. But that isn’t all. We are also accounting for the mouse
overshoot, when you try to move it rapidly and hit the max position. Instead of
going to the max quickly, you would see it going slowly in the curve and slowing
down gradually, as you would get to the end position later due to the lerp. This
image should make it more clear.
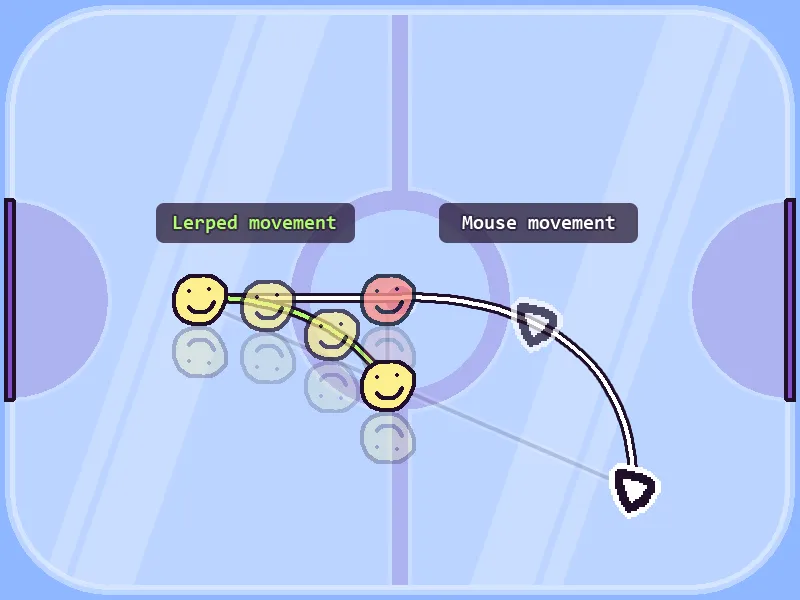
In that case, we check if player’s final position is at the max (or min) and
increase the lerp amount to a higher value this.overshootLerp. That way player
can zoom there much more quickly and by that you eliminate the curve that would
happen otherwise. The curve is also happening because even if you think you are
moving with mouse in a perfect straight line, once you reach the max abruptly,
you also move your hand up or down, naturally. And this looks much more
exaggerated once you hit the imaginary barrier earlier than you anticipate and
move your mouse past it.
All that is running in update function each frame and the lerp value is
multiplied by the delta time (time passed since the last frame update).
You might also wonder why we are not updating the player pos immediately and send it to the server first. You could do that, but by sending first we are making both players have the same movement, making the server to have “the last word” over the pos, which makes it more fair and visually equal. And as a bonus, we are getting an on-ice effect as well.
Using our player object
Right now, you can see players spawn on their half, but you can still point &
click to move anywhere instead. Code responsible for that is somewhere in the
/client/src/scenes/lobby.ts file. If you have managed to find it on your own,
you can ask for a digital banana sticker on our
Discord (while the supply lasts). We
will change the file gradually and get there. Add to the top after the other
imports:
import player from "../objs/player";Find these lines with onAdd listener and replace them like this:
// listen when a player is added in server state
$(room.state).players.onAdd(async (player, sessionId) => {
    spritesBySessionId[sessionId] = await createPlayer(room, player);
});
We changed it to be asynchronous. You might have noticed we haven’t used any
sprite loading yet. We will change that for createPlayer(). But let’s replace
that click to move code first with this, along the way down at the bottom of the
scene function:
k.onClick(() => {
    k.setCursorLocked(true);
});
We will still use mouse for the movement (obviously). And as that can be really
frantic at times, we will lock the cursor to the canvas so you don’t move away
from the window accidentally. Which would result in player stopping, as we
mentioned earlier. We have moved the movement logic to the player itself
already.
So let’s change createPlayer() function to use our player object:
async function createPlayer(room: Room<MyRoomState>, playerState: Player) {
    await k.loadSprite(playerState.avatar, `assets/${playerState.avatar}.png`);
    await k.getSprite(playerState.avatar);
    return k.add(player(room, playerState));
}
As you can see, we made it asynchronous to load player’s avatar as a sprite
first and made sure sprite data are loaded as well, before we create player
object and return it.
Now, you can test the silly movement we have worked on so hard! 🥳
Adding the puck
So far it looks relatively simple with the movement client/server-wise, but syncing physics is a huge topic. Maybe for multiple guides with different approaches. Especially, when syncing a fast paced object like a puck that players interact with. You could do physics server-side, choose one client to be a “host”, determine the outcome and sync it to the other clients, etc… Or we can be smart and do something you wouldn’t have a headache from.
As the Air Hockey is basically one player hitting puck at the time, we can switch the “host” or authority - player that will let the physics to play out as they happen, and just sync it to the others. As soon as someone hits the puck, it changes them to be the host/authority. This way you get 100% accuracy where the puck is supposed to go, as the player hitting (you) is dictating it. If we were just syncing position of the puck itself, the chances the puck would go two different ways is very high as there can be a difference of just a few pixels when the hit happens for both players depending on their last updated position. Thanks to the authority switching, you avoid that by having the one source of truth at the time.
Let’s create the puck object, at our usual objects location
/client/src/objs/puck.ts:
First, we import all things used, as always:
import { getStateCallbacks, Room } from "colyseus.js";
import type { Collision, DrawRectOpt, GameObj } from "kaplay";
import type { MyRoomState } from "../../../server/src/rooms/schema/MyRoomState";
import { k } from "../App";
Next, we define a couple of constants we will use. The puck size and the
center startPos:
const size = 48;
const startPos = () => (k.center().sub(0, 6));
We made startPos a function to recalculate the center, just in case. Also, the
sub part is an offset to compensate the fake 3D perspective it has.
And now to the object itself:
export default (room: Room<MyRoomState>) => [
    k.pos(startPos()),
    k.anchor("center"),
    k.area({
        shape: new k.Circle(k.vec2(0), size / 2),
        restitution: 0.2, // bounciness
    }),
    k.body(),
    k.scale(0), // we will scale-in the puck on spawn
    k.z((k.height() - size) / 2), // starting Z is the center of Y
    "puck",
    {
        add(this: GameObj) {
            const $ = getStateCallbacks(room);
            const localPlayerId = room.sessionId;

            // scale the puck in
            // delay it if joining mid-game/resetting
            k.wait(
                room.state.puckX || room.state.puckX ? 1.25 : 0,
                () =>
                    k.tween(
                        this.scale,
                        k.vec2(1),
                        0.25,
                        v => this.scale = v,
                        k.easings.easeOutBack,
                    ),
            );

            this.onCollide("localPlayer", (_: GameObj, col: Collision) => {
                // inform server of the hit
                room.send("puck", { ...this.pos, hit: true });
                // reset the current velocity
                this.vel = k.vec2(0);
                // simulate new hit with force by scaling the collision direction
                this.applyImpulse(col.normal.scale(col.distance).scale(100));
            });

            this.onCollide("boundary", () => {
                k.shake(2);
            });

            // reset velocity when lastHitBy changes as at this point the other player will only listen for the pos change
            $(room.state).listen("lastHitBy", (id) => {
                if (id == localPlayerId) return;
                this.vel = k.vec2(0);
            });

            this.onCollide("net", async (net: GameObj) => {
                // inform server only once, when local player registers the hit
                if (room.state.lastHitBy != localPlayerId) return;

                k.addKaboom(
                    k.vec2(
                        k.clamp(100, room.state.puckX, k.width() - 100),
                        room.state.puckY,
                    ),
                    { scale: 0.8 },
                );

                room.send("goal", net.team);
                room.send("puck", startPos());
            });

            // update puck depending on authority/local player
            this.onUpdate(() => {
                // when local player is authority, just report the puck pos
                if (localPlayerId == (room.state?.lastHitBy ?? localPlayerId)) {
                    room.send("puck", this.pos);
                    // when player isn't authority, lerp the reported pos
                }
                else {
                    this.pos.x = k.lerp(
                        this.pos.x,
                        room.state.puckX,
                        12 * k.dt(),
                    );
                    this.pos.y = k.lerp(
                        this.pos.y,
                        room.state.puckY,
                        12 * k.dt(),
                    );
                }

                // sync Z sorting by the Y axis
                this.z = this.pos.y;
            });
        },

        draw() {
            const side: DrawRectOpt = {
                pos: k.vec2(0, size / 4),
                anchor: "center",
                width: size,
                height: size * 0.75,
                color: k.Color.fromHex("4a3052"),
                outline: {
                    width: 4,
                    color: k.Color.fromHex("1f102a"),
                },
                radius: [8, 8, size, size],
            };

            // Raytracing :)
            k.drawRect({ ...side, pos: side.pos?.scale(2), opacity: 0.2 });

            k.drawRect(side);

            k.drawEllipse({
                anchor: "center",
                radiusX: size / 2,
                radiusY: size / 2 - 4,
                color: k.Color.fromHex("7b5480"),
                outline: {
                    width: 4,
                    color: k.Color.fromHex("1f102a"),
                },
            });
        },
    },
];
The biggest point to take from this code is that we had to think of how to
set up collisions and when to send the puck data or when to just apply them. Once
again, the local player is the one who is the authority of the puck physics, so
as soon as it’s hit, besides sending the new pos, it informs about the hit itself
room.send("puck", { ...this.pos, hit: true });. Then, it’s checked in
onUpdate if the lastHitBy was the local player. In that case, it continues
sending updates of the puck’s position, each frame. Or if not, it means it’s
the other player, which will just apply the updated position from the
room.state.
Another thing to mention is that whenever the lastHitBy changes, we need to
reset puck’s velocity for the other player, otherwise it would battle with the
manual position that is sent and applied from the server. It would make the puck
shake if the other player hit the puck, but the local player didn’t register
that hit, due to the latency or lerp.
Besides the position and player hit event, we have already set up the goal
event, when it collides with the net. It explodes, of course, then informs the
server about it and resets its pos. We will expand on this later, when we
implement the score. But for the "puck" event to work, we still need to listen
for it on the server. So let’s head to the /server/src/rooms/MyRoom.ts and add
the listener to onCreate, below the "move" event:
this.onMessage("puck", (client, message) => {
    if (message?.hit) this.state.lastHitBy = client.sessionId;
    this.state.puckX = message.x;
    this.state.puckY = message.y;
});
And finally, let’s import it to the game scene itself
/client/src/scenes/lobby.ts:
Below the other imports:
import puck from "../objs/puck";In the lobby scene function opening code, below the playground object:
k.scene("lobby", (room: Room<MyRoomState>) => {
    k.add(playground());
    k.add(puck(room));
    // ...
Finally, we can have some fun on the field! Although, we have to finalize the goal mechanic and the score.
Goal! & The Score
If you were paying attention, you would remember we were already sending the
"goal" message when the puck hits the net. Let’s head back to the server code
and listen for it. In the /server/src/rooms/MyRoom.ts we will add a new
listener below the this.onMessage("puck", ...):
this.onMessage("goal", (client, teamNet) => {
    const team = teamNet == "left" ? "right" : "left";
    this.state[`${team}Score`] += 1;
    const pad =
        Math.max(this.state.leftScore, this.state.rightScore).toString().length;

    this.broadcast(
        "score",
        `${String(this.state.leftScore).padStart(pad, "0")}:${
            String(this.state.rightScore).padStart(pad, "0")
        }`,
    );
});
Notice that the team score is the one opposite to the net the puck went in.
We are also doing a fancy formatting, padding the number to be the same digit
length (e.g. 0:0, 10:00). Then you should notice we are doing
this.broadcast("score", ...); to send the message to all clients, so we can
easily listen to this event.
We are getting close, but we are not done yet. We need to do multiple things and edit multiple files to address the goal/scoring.
Let’s start with the puck as we might still have it in mind. It’s at the
/client/src/objs/puck.ts if you forgot like Mark did. Find the line with net
collision this.onCollide("net", ...); and add the new message listener shown below:
room.onMessage("score", async (score) => {
    // reset puck physics
    this.vel = k.vec2(0);
    // ignore player collisions until we start new round
    this.collisionIgnore.push("player");

    // add some effects
    if (score != "0:0") {
        k.shake(10);
        k.flash(k.getBackground() ?? k.WHITE, 0.25);
        k.burp();
    }

    // scale out the puck before resetting it
    await k.tween(
        this.scale,
        k.vec2(0),
        0.25,
        v => this.scale = v,
        k.easings.easeOutQuad,
    );
    room.send("puck", startPos());
    this.pos = startPos();

    // scale it in after round starts and restore player collisions
    k.wait(1, () => {
        this.collisionIgnore = this.collisionIgnore.filter((c: string) =>
            c != "player"
        );
        k.tween(
            this.scale,
            k.vec2(1),
            0.25,
            v => this.scale = v,
            k.easings.easeOutQuad,
        );
    });
});
With this code, we added some sort of rounds mechanic. Puck will disappear and reappear one second after scoring in the net. At the same time, we are going to reset players to their starting positions as well. In the meantime, we disabled the collisions for the accidental hits while doing so. Let’s implement it for the players as well.
Open /client/src/objs/player.ts and scroll down to the onLocalPlayerCreated
function. We will add new listener, above the const move:
room.onMessage("score", () => {
    mousePos = playerObj.startPos;
    playerObj.controllable = false;
    room.send("move", mousePos);

    k.wait(1.25, () => playerObj.controllable = true);
});
I think this code is fairly self-explanatory. But Mark needs it to be summed up.
We are resetting our local mousePos to the player’s start position, disabling
player movement by using the controllable property that we have prepared
earlier for, syncing the position back to the server, and making the player
controllable again after the new round starts.
Adding the score object
Before we add the score info to the game, let’s download a nicer font and set it as the default.
Get the font by right clicking
this link
and saving it as happy-o.png to the /client/public/assets folder. Then open
the /client/src/App.ts file and change the default font in the kaplay() init
options:
// Initialize kaplay
export const k = kaplay({
    // ...,
    font: "happy-o",
});
Load the font right at the start of the main() function:
async function main() {
    await k.loadBitmapFont("happy-o", "./assets/happy-o.png", 31, 39);
    // ...
Also, update the joining text font size below:
const text = k.add([
    k.text("Joining room ...", { size: 28 }),
    // ...
And the final “puzzle” to our game is the score object itself. So let’s create
it at /client/src/objs/score.ts:
import { Room } from "colyseus.js";
import type { GameObj } from "kaplay";
import type { MyRoomState } from "../../../server/src/rooms/schema/MyRoomState";
import { k } from "../App";

export default (room: Room<MyRoomState>) => [
    {
        textWidth: 24 * 3,
        draw() {
            k.drawRect({
                anchor: "top",
                pos: k.vec2(0, -6),
                width: this.textWidth + 30,
                height: 54,
                radius: [0, 0, 16, 16],
                color: k.Color.fromHex("1f102a"),
                opacity: 0.8,
            });
        },
    },
    k.anchor("top"),
    k.pos(k.width() / 2, 6),
    k.fixed(),
    k.z(9999),
    k.text(`${room.state.leftScore ?? 0}:${room.state.rightScore ?? 0}`),
    k.animate(),
    {
        add(this: GameObj) {
            this.textWidth = this.width;

            room.onMessage("score", (score) => {
                this.text = score;
                this.textWidth = this.width;

                this.animation.seek(0);
                this.animate("scale", [
                    k.vec2(1),
                    k.vec2(0.75, 1.05),
                    k.vec2(1.2),
                    k.vec2(1),
                ], {
                    duration: 0.2,
                    loops: 1,
                });
            });
        },
    },
];
We added a small bar to the top of the screen, centered horizontally. And made
it fixed and on top of everything as well, so it’s not affected by the game
underneath. The most important part is that we listen to "score" message and
update the in-game score with received updated score string. As a bonus, we
added a little animation to nudge the whole score bar as well.
And finally, let’s import it in the lobby scene, as always
/client/src/scenes/lobby.ts:
In the beginning of the file, below the other imports, add:
import score from "../objs/score";And add it below the other objects in the createLobbyScene function:
export function createLobbyScene() {
    k.scene("lobby", (room: Room<MyRoomState>) => {
        k.add(playground());
        k.add(puck(room));
        k.add(score(room));
// ...Nice indeed. I think we got us some Air Hockey game. 🥳
Resetting the game
Hold on! We forgot one thing about the score. Mark almost tricked us so he can cheat. When one of the players leaves, the other would keep the score. So Mark could be winning immediately after you join. Same when he starts playing alone. We need to reset the game when any player joins or leaves!
Let’s head to the /server/src/rooms/MyRoom.ts and find both onJoin and
onLeave events. Add the following as the last lines in the each of them:
this.state.leftScore = 0;
this.state.rightScore = 0;

this.broadcast("score", "0:0");
Not only do we reset the score, but we also informed the remaining player. For
that, we reused the "score" message that our game already implemented. It
resets the puck’s position to the center, player to its initial position and
resets the score as well. Neato, finito.
Where to go with the game next
We could improve it further (and forever). By adding some small features, like doing countdown after each goal with proper round timing. Or some bigger ones, like adding the goalkeepers! I think that could be your homework.
Although, we surely all agree it could use at least a one more sound, besides the burp one on goal (this one will have to stay). And it’s the sound of the puck hitting the wall. And the player hitting the puck (although adding burp here is tempting too).
Ok, right click
this link
to download the sound and save it to the new folder at /client/public/sounds
as hit.mp3.
Load it in the /client/src/App.ts file, in the main() function below the
k.loadFont(...);:
k.loadSound("hit", "sounds/hit.mp3");Now, you might think this is going to be an easy change and we chose it for that. Quite the opposite. And you will learn one more important thing.
Normally, we would do something for the puck object, like this:
this.onCollide("boundary", () => k.play("hit"));But this will only play when the local player is the authority. It’s due to the puck’s position either being lerped, or having a latency. So there is a very high probability that when the other player hits the puck to the wall, it won’t sync position for you exactly when the puck hits the wall. We will have to split it for the local player, and the other players as well, just like we were doing with the puck position. And instead of limiting it only to the sound, let’s also make it more general to give you one more idea how to sync in-game events and data.
Events & data syncing
Let’s implement it on the server side first. We will listen for "event"
message and broadcast another message to all clients, based on the received data.
Open /server/src/rooms/MyRoom.ts and add this below the
this.onMessage("goal", ...);:
this.onMessage(
    "event",
    (
        client,
        { name, exceptLocal, data }: {
            name?: string;
            exceptLocal?: boolean;
            data?: any;
        } = {},
    ) => {
        this.broadcast(
            name ? `event:${name}` : "event",
            data,
            exceptLocal && { except: client },
        );
    },
);
We are expecting the second message argument to be an object, with the optional
name property like "hit", optional exceptLocal to exclude the “sender” and
any data (we will use it later). Once server receives this event message, we
will broadcast another one to inform all clients, optionally except the local
one. We have already used broadcast once, but we haven’t used the except
option it offers. So thanks to that, the message will be broadcast only to the
other players without any additional work on our part!
First, we will add the hit sound on collision with "localPlayer". Open the
/client/src/objs/puck.ts, find the this.onCollide("localPlayer", ...); and
update it like this:
this.onCollide("localPlayer", (_: GameObj, col: Collision) => {
    room.send("puck", { ...this.pos, hit: true });
    this.vel = k.vec2(0);
    this.applyImpulse(col.normal.scale(col.distance).scale(100));
    k.play("hit");
});
And for the other players, add this below the "localPlayer" collision code:
this.onCollide("player", (obj: GameObj) => {
    if (obj.is("localPlayer")) return;

    room.send("event", { name: "hit" });
});
We are checking if the player isn’t local one, meaning the other player. In that case we send the hit event. All players will listen to this event.
In a similar fashion, we are going to update "boundary" collision as well.
It’s right below it:
this.onCollide("boundary", () => {
    if (room.state.lastHitBy != localPlayerId) return;

    k.shake(2);
    k.play("hit");
    room.send("event", { name: "hit", exceptLocal: true, data: "boundary" });
});
First, we are checking if the localPlayer is currently the authority, meaning
the source of truth of the puck movement and the hit. The server will inform us
about this hit instead. However, we are excluding the local player from
receiving this event as the sound already played for them. Otherwise we could
potentially hear the hit twice. This time we are also sending data property to
differentiate the hit target. When hitting the walls, we are also shaking the
screen.
Final code to listen for the hit event sent by the other players will look like this. Paste it below:
room.onMessage("event:hit", async (target) => {
    k.play("hit");
    if (target == "boundary") k.shake(2);
});
This was and always will be confusing. We could do it easier, by not playing any sound for the “local” or “authority” player first and just sending the event in all cases to listen to. Although, this could introduce some delay when the latency is high, or duplication as already mentioned. Nevertheless, it’s good to know about this caveat, and more importantly, how to solve it.
Syncing the other collisions
Now that we have another trick up our sleeve, let’s fix another collision that is not syncing. You might have noticed that the kaboom animation on a goal is only showing for the player that scored. Or in other words, the local one with authority over the puck. This is also because of the lerp and the latency. For the local player, the puck collides with the net. But that doesn’t happen for the other player, they are just informed about it. You can try to fix it yourself to test if you understood the past learning. It’s very simple this time. You just move one line. Or, you can continue with us right away.
Once again, we are going to edit /client/src/objs/puck.ts. Find the
this.onCollide("net", ...); function and remove the k.addKaboom(...); line.
We are moving it to the room.onMessage("score", ...); listener, right after
the if (score != "0:0") { condition opening. Like this:
if (score != "0:0") {
    k.addKaboom(k.vec2(k.clamp(100, room.state.puckX, k.width() - 100), room.state.puckY), { scale: 0.8 });
    // ...
An easy fix, at last. Now the kaboom is added for both players, as both players are informed about the score update at the same time after scoring a goal.
“Sync” about it
You will always have to think, if the thing you are doing will happen for both players and/or needs to be synced. For that case, now you should know the idea of “local” player and all the syncing methods available.
Bonus: Adding touch support for easier multi-device testing
Nowadays, almost everyone owns a smartphone. And you can’t play with one mouse in two browser windows at the same time. So it makes sense that you would like to try play-testing against yourself more interactively and use your phone as the second player. Let’s add support for it. It’s going to be a quick one!
Open /client/src/objs/player.ts and look for the
let mousePos = playerObj.startPos; line. Add a new variable below it:
let mousePos = playerObj.startPos;
let touchPos = playerObj.startPos;
Now, look for the k.onMouseMove(move); line. Add this code below it:
k.onTouchStart(pos => touchPos = pos);
k.onTouchMove((pos) => {
    move(pos, pos.sub(touchPos).scale(window.devicePixelRatio), false);
    touchPos = pos;
});
First, we are saving the initial touch position on touch start. Then, we are
using the same move function that mouse uses and we simulate the needed
arguments for it. pos is a reported position by touch move, next argument is
simulating the delta - just the difference between the new and the last pos,
additionally scaled by the device pixel ratio (as the phone has different screen
size/resolution/density). Without it, it would move slightly slower than you
would expect. And the last one false is for the isMouse parameter.
We were already thinking about it when implementing move function because of the fact that we are using cursor lock and checking if the cursor is locked. And we made sure to check for it only when the input device is mouse (true as default). On the other hand with touch, there is no cursor to lock and we can’t lock your finger (yet).
Now you will be able to control the player by touch. Time to learn how to test it on different devices.
Testing your game with family members and friends
You can test your game on multiple devices in the same network by simply passing
--host before starting the client dev server.
cd client
# Linux
npm run start -- --host
# Windows
npm run start -- -- --host
Now you can notice it generated multiple addresses, we are interested in the Network one, like following:
-> Network: http://192.168.1.2:5173/The IP would be of your PC that is running this command, which you would navigate to on your other devices.
To eliminate the additional step of passing --host parameter to expose host
each time, we can tell Vite to do it by the default. Just open
/client/vite.config.ts and add server.host option:
server: {
    // proxy, etc...,
    host: true,
}
That would cover the testing with family members or simply testing your game on your multiple devices.
Testing with friends
To test your game with friends, your IP would have to be public, accessible to
the outside world and port forwarded. Or you could simply use included tools to
expose it for you securely, for free. You can use either cloudflared, or
ngrok. Both are well known and established solutions. If you run into issues
with any, just simply try the other one.
Cloudflared
cd client
npm run cloudflared
Ngrok
You need to register a free account on ngrok.com. Follow instructions after the first run.
cd client
npm run ngrokYou will get the randomly generated URL that you can send to your friends to test your game with.
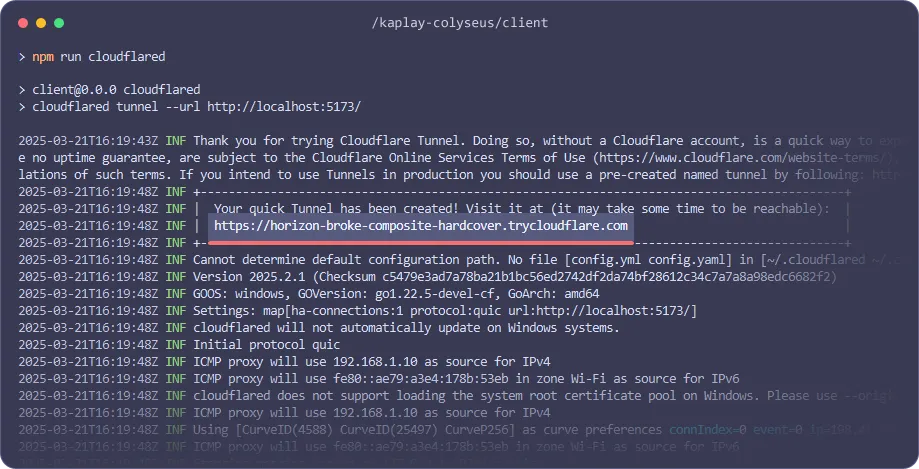
Note that Cloudflare will do a bunch of request when you start the tunnel and open the link, resulting in a few connected players across multiple rooms. Just give them a minute to disconnect so you are actually alone in the game, to ensure the next connection will be an actual person. You can see them joining/leaving in your server terminal. Sadly, there is no way to detect and filter them out.
Also, beware that overseas connection latency to your PC will be higher. Performance also depends on your PC specs.
Publishing your game
This will be the two part section as you need to deploy your server and host your game (client) somewhere online. These can depend a lot on your experience and skills, but there are some user friendly options as well.
Deploying Colyseus server
You have two options how to deploy your Colyseus server.
- Self-hosting
- You are free to host your Colyseus server anywhere you want and Colyseus itself provides you with a few options and guides on this topic at https://docs.colyseus.io/deployment
- Colyseus cloud, premium managed hosting
- This is the easiest option that would take you around 10 minutes to get your server up and ready for production
- Learn more about that at https://docs.colyseus.io/deployment/cloud
Note that both options are paid and require a use of credit card
Using Colyseus cloud
Choosing Colyseus cloud is the easiest option as you are almost ready to deploy your server.
At this point, you should commit and push all your changes to your git repository. Then, all you need is to register an account at https://cloud.colyseus.io/ and connect your GitHub repository.
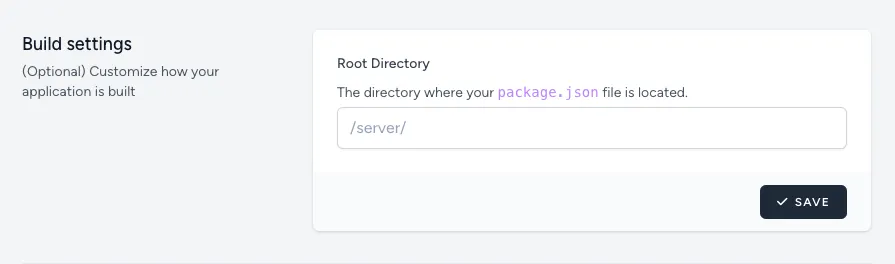
Before running the deploy script, we need to update our build settings within
the dashboard/project, as our Colyseus server is located inside of /server
directory.
Now, you can run the deploy script. The first time doing so, you will be redirected to your browser to choose the application you want to deploy.
cd server
npx @colyseus/cloud deploy
After following instructions in browser, It will create .colyseus-cloud.json
file in the server folder with credentials for further deployments without any
additional steps. You should not commit this file so better add it to your
.gitignore.
After a while your server should be up and running! 🥳
Publishing your game (client)
If you remember in the section about how the game communicates with the server,
there was an endpoint URL to your server. We need to change this for the
production as your game won’t be running on the same server. You can get your
endpoint in the Colyseus cloud dashboard, it will
look like https://<region-random-code>.colyseus.cloud. Now we update our
/client/src/core/colyseus.ts file like this.
export const SERVER_URL = !import.meta.env.PROD
    ? `${location.protocol}//${location.host}/colyseus`
    : "https://<region-random-code>.colyseus.cloud";

export const colyseusSDK = new Client(SERVER_URL);Now we can run the build command in the /client folder:
cd client
# Linux
npm run build
# Windows
npx vite build
Game will be built in the /client/dist folder, ready to be uploaded. You can
also test the build by running npm run preview command. From there, you should
see you are connecting to the live Colyseus server instead of your local one.
Finally, you can upload your /client/dist online! You can learn more about it
in the publishing guide, there is an
example for itch.io and NewGrounds. Other free options could be Cloudflare
Pages, Vercel, Netlify or simply GitHub pages, to name a few.
Final notes and where to look further
As we mentioned earlier, you can refer to Colyseus documentation or ask for further assistance on the official Colyseus Discord server with library’s excellent creator Endel himself present. 🙂
Similar for KAPLAY, you can find our other guides and API docs in the left sidebar as usual and are very welcome to our helpful KAPLAY Discord as well!
Also, don’t forget to share your creations or any feedback with us. Good luck with your games!


 Guides
  API Reference
  Blog
Blog 